Christmas Sew-A-Long Week 2
- Sarah Fielke

- Nov 10, 2025
- 7 min read
Hello Christmas Sew-A-Long peeps and a Merry Almost Festive Season to you! Five and a bit weeks to Christmas really is getting very close - I am NOT ready so I had better get my Christmas skates on.
This is the second in our series of four blog posts for the Christmas Sew-A-Long. Each week we are are going to look at a different one of the projects included in the program, and give you some tips and tricks for making them - this week its the Jingle Bell Stocking!
Thanks to everyone who has been posting check-ins on Facebook and Instagram! I'm loving seeing your projects.
If you haven't joined the Sew-A-Long and would like to you can do that HERE, its free! All you need to do is purchase one of the patterns we will be working on (or own one already!), and then enter your name and email address at the link. That means you'll go into the draw to win some of the win prizes I'll have at the end of the four weeks. As you make progress with the projects, make sure and email me a pic (sarah@sarahfielke.com), post one here in the comments, post one to Instagram and tag me (@sfielke) or post one on Facebook and tag me - each time you post gives you another entry into the prize draw. The patterns included in the Sew-A-Long are my Jingle Bell Stocking; my two Christmas embroidery panels, Merry and Bright and The Christmas Crew; my Christmas Tree Skirt, Merry and Bright; and Five Fabric Baubles.
Has anyone started making the Five Fabric Baubles? I would LOVE to see them if you have. They are quick and fun to make, not to mention cute and charming and festive. They tick all the boxes
😍


This week there's no video here, but the Jingle Bell stocking is easy to construct. There is a video tutorial for all those who have purchased the Jingle Bells pattern. Damian has opened access for you you have purchased. Let him know at bom2017@sarahfielke.com if he missed you. If you decide you don't want to do hand appliqué, you can always do it by machine, or use fusible webbing and a blanket stitch around the edges of the Bow and the Bell. If you've never hand appliquéd before and would like to give it a try, I recommend that you take my online hand appliqué class - its on demand, you can watch it as many times as you like and your access doesn't expire, and it teaches you everything you need to know about my method of needleturn appliqué.
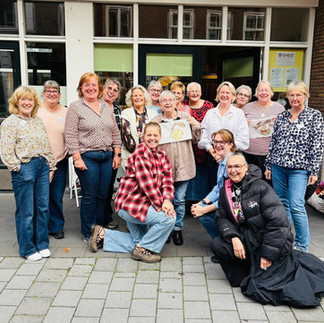
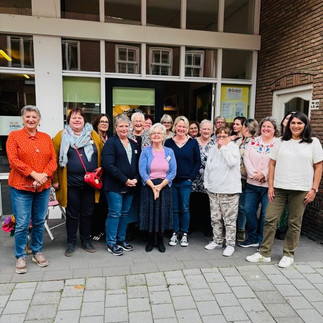
Wait, what Bell?? 😂 I taught this stocking in two classes in The Netherlands recently, and everyone in BOTH classes thought that this was a Christmas bauble, and wondered why it had holes, or dots on it. It's a big JINGLE BELL everyone! The kind that Santa has on his sleigh, that makes a beautiful clear and crisp Christmas ring as he flies through the sky. (Have you seen the movie The Polar Express? That's what was in my mind when I designed this. You haven't seen it?? Ooooh it's one of my very favourite Christmas movies, queue it up right now!). I'd love to know if anyone realised it was a bell.... or do you all think it's a bauble? Here's some photos of my happy students stitching in Den Bosch. And one of me with my dear friend Wietske, who owns the beautiful store I teach in there.


Regardless, this post gives you a couple of tips on hand piecing the stars, if you've never hand pieced before. They don't need to be hand pieced, but they are lovely and relaxing to stitch that way, and can be done in front of the TV (while you're watching The Polar Express, of course). If you decide you would like to hand piece them, there's a little acrylic template set available for the star point and both squares, that gives you the seam allowance and registration holes to mark your seam allowances. Acrylic means you can rotary cut these too, if you're so inclined.

Hand piecing is a little different than machine piecing. When you stitch with a machine, you have a machine foot to help you guide as you sew, to keep you not only straight but also accurate. With hand piecing you have to create that line for yourself. Our templates have registration holes in the corners - so you can trace all the shapes out on to the back of the fabric, and then mark the place for the corner of each seam through the holes. I like to butt the template shapes up against each other so that you get more shapes out of your fabric, it's fine if they share an outer line. Make sure to use a very sharp pencil when you trace the shapes, and keep sharpening it as you go, because as you trace around shapes and mark seams and your pencil gets blunt, your lines become less accurate. (Apologies that my template here says Simple Folk - I don't have a set of Jingle Bell templates because I made my own when I was actually making the stocking).


Once you have traced around all the shapes and marked through the holes, go back and join the dots up to create your stitching lines. The lines only need to go between the points, not all the way to the edge of the fabric. I like to use an add a quarter ruler for this step - we have those at the website too if you need one.


Cut the shapes out using sharp scissors.


Put a pin through the dot at the corner, and make sure to match it with the dot on the other side. Repeat with the dot at the other end.


Use a fine needle and thread for the stitching - you're doing the work of a sewing machine, so you want your stitches to be as small and as close together as you can manage, without going completely bonkers. Its much easier to make smaller stitches if your tools are small to start with - fairy stitches can't be made with a thick needle and thread. I like my own brand milliners needle in a #11 for hand piecing, and Aurifil 80 weight thread, but 50 weight is good too if you don't have 80 weight. I always use a colour to match the fabric so that you can't see the stitches in the seam after it's pieced, but here I've used a contrasting one so that you can see my stitches.


Essentially you're just working a running stitch. Begin at one dot, remove that pin and put your needle into the hole it came out of. Every few stitches, I like to take a back stitch for security. When you come to the next dot, tie the thread off. The star is assembled in exactly the same order as the pattern instructs - except that you are ONLY stitching between the dots, so when you get to a seam junction, pass your needle through all the dots at the junction and give it a good tight pull to secure it, and then keep stitching without sewing the actual fabric of the seam down in any way. Unlike machine stitching, where you stitch over all the previous seams in order to make a new seam, in hand piecing your seam allowances are all free standing.


If you don't want any appliqué at all on the stocking, you can easily just make it all stars, on both front and back. My stocking doesn't have anything on the back, but you can make the stars cover it both sides very easily - just make sure that when you do, you REVERSE the direction of the construction, so that the foot turns in the opposite direction to the front of the stocking. The panel of appliqué is 8" wide when stitched in, and the stars are all 4" finished, so you can just drop two stars into that space where the appliqué is. If you're feeling adventurous, you can also nest the corners of those stars, which will make them shorter by 1" - that would mean you can get 3 stars into the space between the top and bottom groups of stars.


The final thing that you need to know is about positioning the appliqué onto that centre panel. I talk about it in the video that comes with the pattern, but I think it bears saying again! Make sure that the bell isn't positioned in the centre of the appliqué panel. You need to measure in 5 1/4" from the right hand edge of the piece of background fabric, and position the string for the bell at that point. That's because if you centre it, the curved section of the stocking (shown here with an arrow) is too wide for the piece of fabric with the bell on it. You can always add another piece of background fabric to the edge to make it wide enough, but when you're positioning the bell it's easier if you just have it in the right place from the start, and the background piece is cut wide enough to make it all fit if the string is positioned at that measurement.


Have fun peeps! If you have questions, check in pictures or you're making one of the other projects in the Sew-A-Long and have questions before I get to the post about it, please feel free to drop them in the comments below so I can help you out. Have a great your second week of stitching, and make sure to show me your progress! There's some really fun prizes and you want to be in the running 🎅🤶🎄 See you next week.
Sarah x
Comments