Design process 3 - The Bird That Got the Berry
- Sarah Fielke

- Feb 8, 2024
- 4 min read
Hi peeps! Sorry, I know its Thursday, but yesterday I was training my new employee and I totally forgot about you my excitement - I’m so sorry!! I've never had an actual employee before, Damo doesn't really count. On Wednesday afternoon after school my little friend Elle is going to come and help me put stickers onto Sarah Fielke needles and thread balm, and pack orders, and tidy up my studio. I get some help doing things that take a lot of my time but aren’t really productive, and Elle gets pocket money - win win! So I’m sorry that I forgot you, but I promise not to do it again in a hurry.
Anyway, on with this week's design insights.
You know sometimes you meet someone and you just instantly click, and then you’re best mates and its like you’ve known each other for years? That’s what happened when I met Robyn, the owner of The Strawberry Thief store, which specialises in Liberty fabrics. Robbie is also the Liberty distributor for Australia, so she’s really the Aussie Liberty Queen. Except that she’s South African. Anyway, I digress.
When you have friends in the same industry there’s always the question of wether you will one day “do something” together! Rob and I decided to make that happen last year, and my Stop, Thief! BOM is the result of that.
The Strawberry Thief design has always been what signifies Liberty to me, and I’ve always adored Rob’s logo, which features the thieving bird after not only the strawberry, but also someone’s needle and thread! When she asked if I wanted to do a BOM together in 2024, the first thing that came to my mind is how much I wanted to appliqué that naughty birdie.

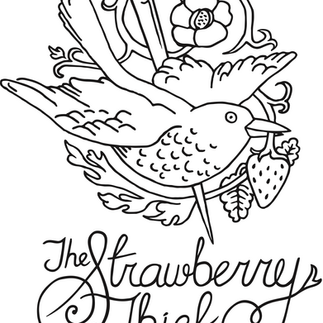


The first thing I did, before I designed anything else, was to have the logo artwork blown up at a copy shop so a bunch of different sizes, from A3 right up to A1 and even bigger. I had to see how large or small I could make the shapes able to be appliquéd, but not lose the detail, and at the same time how to simplify the drawing so that the shapes could be taken apart and made into appliqué patterns. I settled on a size I liked and then made shape after shape from the overblown artwork, drawing and redrawing the templates until they were easier curves and points etc and able to be more easily appliquéd.
Then I took to my graph paper. The first iterations of the design had the bird sitting in a large square in the centre of the quilt, but as I started to research for the design I changed my mind.
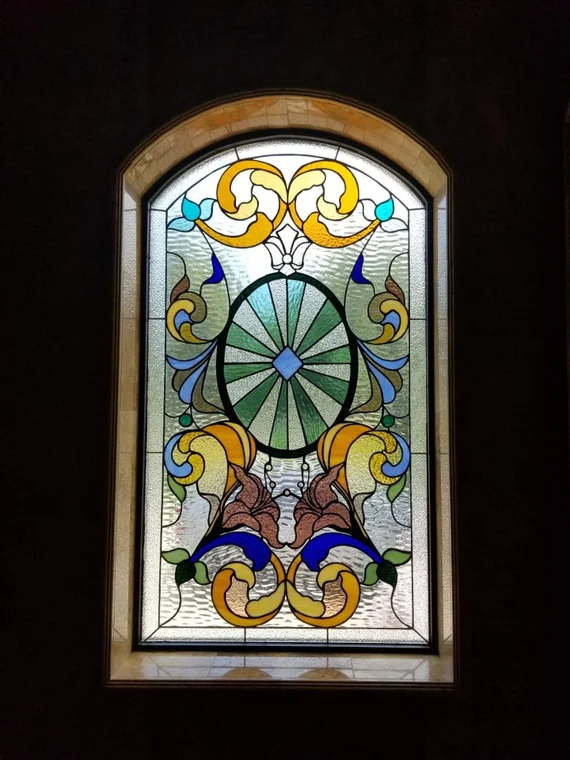
I wanted to echo some elements of Arts and Crafts/Art Nouveau design in the quilt, in a small way (sometimes these things are only visible in my head!), and so I looked into shapes of flowers and leaves in drawings, paintings, glasswork and furniture.


Sometimes these things are a HUGE part of my design process, and sometimes the design just pops out of my head ready to go. This time I fiddled for ages and pulled lots of pictures to look at to try to get a flavour between that and “me” that worked.
I decided that the bird would sit in a circular window in the centre of the quilt, with the corners rounded off in the period style like a bannister or stained glass window. That led me to thinking about furniture and frames, and I decided that all the appliqué in the second border would be framed in the same way.

As it’s only a 6 month program I had to make sure I didn’t get TOO carried away with details - after all everyone needs to get the sewing done in the time frame!! And so I made the final border a little simpler - but it was actually this period fireplace that gave me the idea for the pieced blocks.

Once I had the framework of the quilt drawn into my grid paper and I knew how big everything was going to be, I started drawing the details.
(If you’re making Stop, Thief! and you don’t want a sneak peek of some of the appliqué drawings, look away now!!)
They’re just sketchy at first, and then I draw them with more intent, and finally I draw the exact size out on a piece of tracing paper. That way I can layer pieces up and change things out easily without having to redraw the whole thing, until I have a final I am happy with.
This piece them becomes the “map” for my appliqué blocks, and its what I make my templates from.
I appliqué from my hand drawn templates first, and then when I’m done and I’m satisfied they all work as I want them to, I send them to my son Oscar. He is the computer design whizz in the family, and he digitises them into the clean, labelled artwork that you get when you download your pattern each month.


And thats it! From chicken to egg, or egg to chicken I suppose really :D
Sarah xx
Comments