Lexi Hoodie Sew Along - Tips Week 3
- Sarah Fielke

- Feb 23
- 3 min read
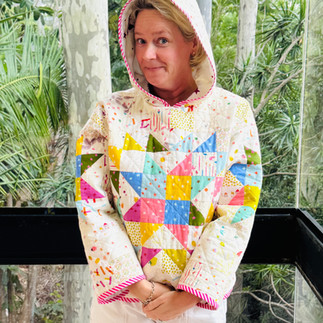
I FINISHED MY HOODIE!! I love it. I’m very excited to wear it but as it’s about a million degrees with a humidity level of a trillion percent in Sydney right now, I think I’ll leave it on the hanger for a little moment yet. I did put it on in the air conditioning so you could see it. I’m hard at work on hoodie #2 and 3, so look out for them in the next few weeks.


This week in the video I’m talking about the construction of your hoodie, and putting the binding on.
The designer of the hoodie, Melly, is also running a sew along on her Facebook page, so I am trying to include things that are different to what she is saying so that we don’t just say all the same things. I have also cheated a little here and there and I have some personal hacks for pinning etc that I use when I dressmake - wether these are actual dressmaking steps or wether they’re what I do I don’t know, as I’m just a quilter!! I’ve shared them anyway and if you‘re a dressmaker and you’re screaming YOU DON’T DO IT LIKE THAT then I humbly apologise and say that it works for me :D
If your pattern has not yet arrived in the mail please let me know sarah@sarahfielke.com and I will get you started on cutting out. There’s a lot of cutting out to be done before you can start sewing so you will be busy I promise!
Assembly Hoodie
Melly’s instructions are excellent, and my hoodie went together like a dream. If you have never made a garment, make sure that you transfer all of the marks for pinning so that you know where everything sits. It is very very helpful if you are new to if you make the lining first, as its easier to stitch and also easier to unpick if you have trouble easing the curves in etc.
I have included a video of how I pinned the curves in on the hood, this method is the same for the sleeves.
Also make certain to clip where Melly recommends. This is important for any garment, but especially for this one as there is no ease in the fabric, and you will put a lot of strain on the seams when putting it on and taking it off if you don’t give it some ease.
If you have any trouble with your hoodie construction, please feel free to shoot me an email - I’m happy to help!
Binding
Ok so I totally cheated with the binding. Melly has you making your own bias binding and that works perfectly, but I’m a girl for convenience when it’s a personal project. I sell quilt bias in a range of different patterns and colours at my website. It’s 1” wide when its flat, with a 1/2” turned under seam on both sides at the back. I have included video of how I used the bias - the method I used does mean that you see the stitching on the INSIDE of the sleeves, hood and bottom edge, but not on the outside, which is where it matters, right? You could also stitch it without doing that by opening one of the folds, and stitching the binding to the inside edge of the hoodie along the fold so it’s invisible.
I am not a fan of the bulge you get when you insert the end of binding inside the other end, it can be very bulky - so I made a ring of binding to stitch to my sleeves and bottom edge, and I’ve put a bit about that in the video too.
Have fun peeps and please feel free to join my Facebook group Sarah Fielke Quilts and post your hoodie progress there! I usually don’t allow posts about other people's patterns in there as its just for people making my patterns, but this time is special! :) And I think everyone would love to see your hoodies coming together. Just search Sarah Fielke Quilts in your Facebook search bar, ask to join and then answer BOTH questions AND agree to the group rules for entry (the only way I can screen spam accounts.
I would LOVE to see your finished hoodies, and so would Melly! Please send them to me either here in a comment below the video, or via email sarah@sarahfielke.com and I will post them on social media for everyone to admire.
Yay hoodies! I will post my finished vintage fabric hoodie here just as soon as it’s done - hopefully this week but maybe next. If you’re making the applique hoodie with me, the flower templates and next steps will be on the StitchyMites page this Wednesday.
Sarah x
It's beautiful Sarah. As always - your work has inspired me. At the moment, my 'plan' is narrow down the inspiration to just one idea LOL. Can't wait to see the other two versions!