
Choo Choo

Hop on board, it's the crazy train. Fabric designs are being finalized, my Słodki quilts are being finished, the book is being edited, my quilts for the show are nearly done to send to be basted, the Sydney Quilt Show is being planned, the QuiltNSW 45th anniversary in 2027 is being planned, the Giucy Giuce challenge blocks are arriving, I'm getting ready to go to Canberra for the Canberra Quilt Show (May 21 - 24), to Queensland to teach at Kimz (bookings for the classes and lecture here! https://kimzsewing.com/?s=sarah+fielke&post_type=product), Sisters is just around the corner (classes here! https://stitchinpost.com/search?type=product&options[prefix]=last&q=sarah%20fielke*) and I am WORN OUT peeps but I'm not allowed to stop just yet!! Holy moley what a bunch of bananas.
I promised you a few weeks ago a little tutorial on how to make a very simple design repeat by hand, and I do always make good on my promises even if sometimes it takes me a little while to get there. So here it is!
Star with a square of paper, the size that you want your repeat to be. This is a 6" repeat, so its a 6" square of paper. Fold and crease the paper in half in both directions.
Draw, or glue, some motifs into the centre of your paper. I am working with a motif from an antique fabric here, so its just a photocopy of the fabric with the flowers cut out, stuck down to get the repeat I want. Make sure that you don't go too close to the edges of the paper.

Cut the paper through the middle vertically.

Turn both sides of the paper so that the cut edges that were in the middle, are now on the outside. Add a couple of extra motifs in the blank spaces, again towards the centre - the only pieces toughing the edges should be where you have cut. Stick the two sides back together, and then make another cut across the middle in the other direction.
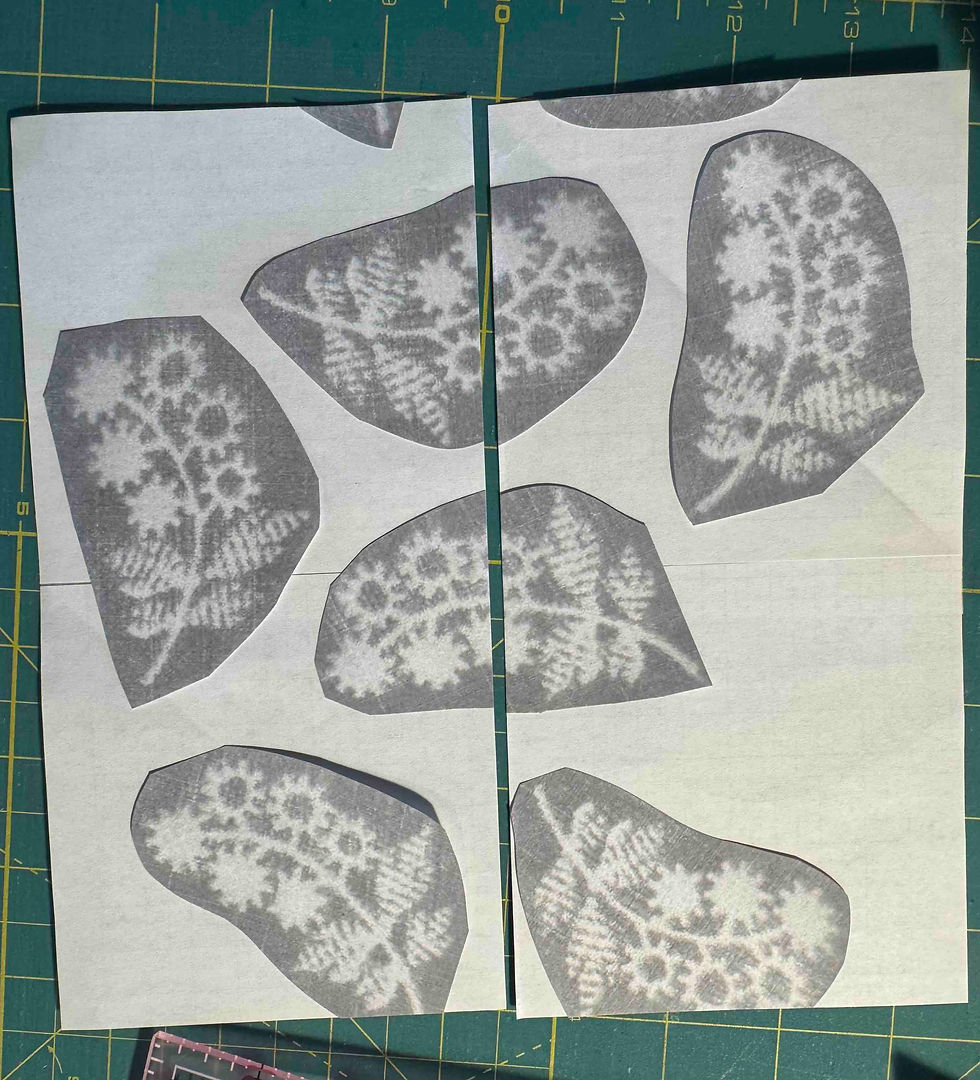
Turn, and stick. Add pieces into the spaces. Cut again in the first direction. Keep going until you reach a stage where you have filled all the centres of the paper, and all the cut edges are on the outside.


Here's where I started adding colour references - but my repeat was going to off to be made into proper artwork, so you may have done this before hand or you may not want to!

And here is the finished repeat - I have copied the 6" repeat 4 times, and stuck those together to see the full toss.

I like to use an app like Layout for really quick instant gratification on something like this! You just put your repeat into it once and it will spit it out in different configurations for you. Here's 9 repeats together...

And heres 9 x 9! Looks just like real fabric, right?? :D

If you wanted to then have your fabric actually printed, you can scan and upload your repeat into Spoonflower. They have a repeat tool, and you can play with getting it larger or smaller onto a fat quarter or a half yard or whatever you like and BOOM - fabric! Cool huh?
OR.....
DRUMROLL PLEASE.......
SHHH YOU CAN'T TELL ANYONE I SHOWED YOU THIS......
You could wait for my fabric to be released and just buy some of that! GASP OMG 🙈🙉🙊


I was never here, you saw nothing. Move along. See you next week.
Sarah x
Very exciting but dont ware yourself out 🫂🌻🦋🐾🙏
So exciting!!!
Now this is exciting Sarah!
LOVE! 🩷